As electronics become smaller and more complex, precision soldering is critical for reliable device manufacturing. This guide covers essential soldering techniques, from basic tools to advanced methods, helping both hobbyists and professionals build high-performance electronics with accuracy.
Preparing for Soldering: Essential Tools and Materials
A successful soldering job begins long before you heat the iron. Proper preparation and having the right equipment are non-negotiable for achieving clean, durable connections.
Key Tools
- Soldering Iron: This is your primary tool. For high-precision work, a temperature-controlled soldering station is ideal. It allows you to set a specific temperature, which is crucial for working with different components and types of solder without causing heat damage. Look for one with interchangeable tips to handle various component sizes.
- Soldering Iron Tips: The tip of your iron is where the magic happens. A fine-point or chisel tip is essential for working with small surface-mount devices (SMDs) and dense circuit boards. Keeping your tips clean and tinned (coated with a thin layer of solder) ensures efficient heat transfer.
- Solder: Solder is the metallic alloy that melts to form the electrical bond. For electronics, lead-free solder (typically a tin-silver-copper alloy) is the industry standard due to environmental regulations. It has a higher melting point than traditional lead-based solder, so a proper temperature-controlled iron is important.
- Flux: Flux is a chemical cleaning agent that removes oxides from the metal surfaces you are about to solder. This allows the molten solder to flow smoothly and create a strong metallurgical bond. It’s available in pens, liquid, or a gel-like paste.
- Solder Wick and Solder Sucker: Mistakes happen. A solder wick (desoldering braid) and a solder sucker (desoldering pump) are tools used to remove excess or old solder from a joint.
- Tweezers and Pliers: Fine-tipped, anti-static tweezers are necessary for handling tiny components. Needle-nose pliers are also useful for bending leads and holding parts in place.
- Cleaning Supplies: Isopropyl alcohol and a small, stiff brush are perfect for cleaning flux residue off the board after soldering. A clean board is not just aesthetically pleasing; it prevents long-term corrosion.
Basic Soldering Techniques
Once your workspace is set up, you can start practicing the two most common types of soldering: through-hole and surface mount.
Through-Hole Soldering
Through-hole components have long leads that pass through holes in the printed circuit board (PCB). This technique is common for larger components like capacitors, resistors, and connectors.
- Prepare the Component: Bend the leads of the component if necessary and insert them into the correct holes on the PCB.
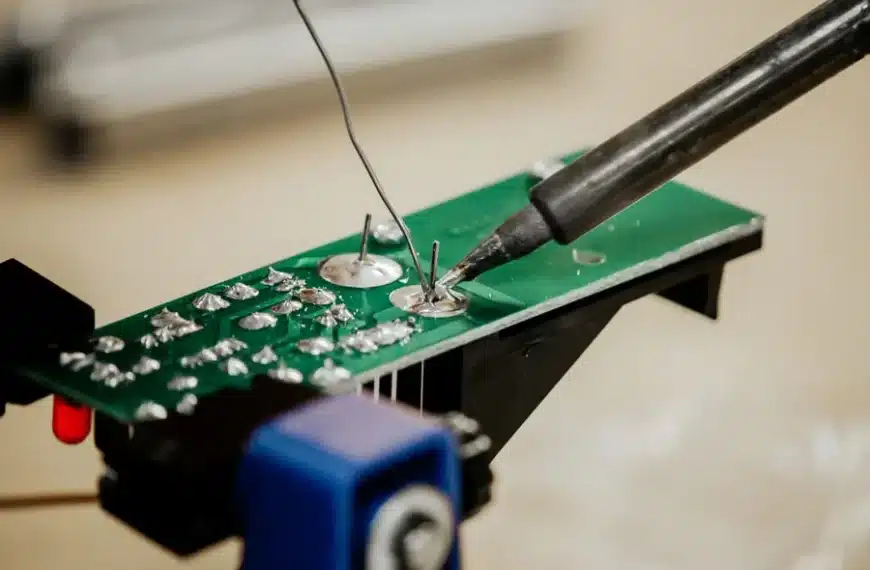
- Heat the Joint: Place the tip of your hot soldering iron so it touches both the component lead and the metal pad on the board simultaneously. Hold it there for 1-2 seconds to heat both surfaces evenly.
- Apply Solder: Touch the solder wire to the opposite side of the joint—not the iron tip. The heat from the pad and lead should melt the solder, which will flow smoothly around the joint. Use just enough solder to form a small, volcano-shaped cone.
- Remove the Iron: Once the joint is covered, remove the solder wire first, followed quickly by the soldering iron. Let the joint cool naturally without moving it.
- Trim the Lead: Use flush cutters to trim the excess lead above the solder joint.
Surface Mount Soldering
Surface Mount Devices (SMDs) sit directly on the surface of the PCB. They are much smaller than through-hole components and require a steadier hand.
- Tin a Pad: Apply a tiny amount of solder to one of the pads on the PCB where the component will sit.
- Position the Component: Using tweezers, carefully place the SMD onto its pads, aligning it correctly.
- Tack it in Place: Reheat the tinned pad with your soldering iron. The solder will melt, securing one side of the component. This is called “tacking.”
- Solder the Remaining Leads: With the component held in place, carefully solder the remaining leads or pins, heating the lead and pad together before applying solder. For multi-pin components like integrated circuits (ICs), a technique called “drag soldering” can be used, where you drag a blob of solder across the pins.
Advanced Soldering Techniques
For more complex and densely packed boards, professionals often turn to more advanced methods.
Reflow Soldering
Reflow soldering is the standard for mass-producing electronics with SMDs. In this process, solder paste (a mixture of solder powder and flux) is applied to the pads using a stencil. Components are then placed on the paste. The entire board is heated in a reflow oven, which follows a specific temperature profile to melt the solder and form all the connections at once.
Hot Air Rework
A hot air rework station is a tool that blows a precise stream of hot air. It’s invaluable for soldering and desoldering multi-pin SMDs, like Quad Flat Packages (QFPs) and Ball Grid Arrays (BGAs), without disturbing nearby components. By heating all pins simultaneously, the component can be lifted off or placed onto the board with ease.
Common Soldering Problems and How to Avoid Them
- Cold Joints: These appear dull, lumpy, and rough. They are caused by insufficient heat, preventing the solder from flowing properly. Solution: Ensure your iron is at the correct temperature and that you heat both the pad and the lead before applying solder.
- Solder Bridges: This occurs when solder accidentally connects two or more adjacent pins, creating a short circuit. Solution: Use less solder. If a bridge forms, use a solder wick to remove the excess.
- Too Much Solder: A large, round ball of solder on a joint can hide a poor connection and waste material. Solution: Apply solder for only 1-3 seconds. The goal is a concave fillet, not a solder mountain.
- Heat Damage: Excessive heat can damage both the component and the PCB. Solution: Work quickly and efficiently. Use the correct temperature and don’t hold the iron on a joint for too long.
CNC Swiss Screw Machining in Electronics
Beyond soldering, the physical components themselves require incredible precision. This is where manufacturing processes like CNC Swiss screw machining come into play. This technology is used to create the tiny, intricate metal parts found in high-end electronics, such as custom connectors, pins, and sockets. The precision of these components is critical, as any deviation can impact how well they fit and solder onto a circuit board. A reputable Circuit Board Manufacturer often relies on suppliers who use such advanced machining to ensure the quality and reliability of every component.
Conclusion
Soldering requires patience, practice, and the right tools. By learning the basics and advancing gradually, you can master the skills to create reliable, high-precision electronic devices. With time and persistence, you’ll solder with confidence and precision.


